Chronic hip tightness and lower back discomfort are common barriers that can derail your fitness progress and diminish your daily focus. In this guide, I will provide you with the essential techniques for the Figure 4 Stretch Exercise, ensuring you understand exactly how to perform it safely to unlock your mobility. You will learn how to integrate this movement into your routine to effectively manage pain and build a more resilient, functional body.
The Figure 4 Stretch Exercise is a highly effective, low-impact movement designed to release tension in the glutes and hips, providing immediate relief for those suffering from stiffness caused by sedentary living. By positioning your body into a „4” shape, you mechanically target the deep rotators of the hip, effectively decompressing the joints and soothing nerves that are often pinched by tight musculature. This is not just a simple stretch; it is a fundamental recovery tool for anyone serious about maintaining a high-functioning, pain-free physique.
Figure 4 stretch exercise
Understanding the Figure 4 Stretch
The figure 4 stretch is a highly beneficial movement designed to alleviate tension within the gluteal muscles and the deep hip rotators. By assuming a shape that resembles the numeral four, you can effectively target areas that often become tight due to prolonged periods of sitting. This stretch is particularly useful for improving hip mobility and reducing discomfort resulting from stiff muscles.
Step-By-Step Guide: The Supine Figure 4 Stretch
To perform this movement while lying on your back, follow these steps:
- Lie flat on your back, ensuring your spine is in a neutral position.
- Bend your knees and keep your feet flat on the ground.
- Place your right ankle across your left knee.
- Gently grasp the back of your left thigh and draw it towards your chest until you feel a comfortable stretch in your right hip.
- Maintain this position for 20 to 30 seconds, ensuring you breathe steadily.
- Keep your top foot flexed throughout the duration of the movement to stabilise and protect the knee joint.
- Release the stretch and repeat the process on the opposite side.
Alternative Seated Variation
If you prefer to perform this stretch whilst seated, it is an excellent way to integrate mobility work into your working day:
- Sit upright towards the front edge of a sturdy chair, keeping your feet planted firmly on the floor.
- Lift your left leg and rest your ankle securely above the right knee.
- Maintain a straight back and slowly hinge forward from the hips, rather than rounding the spine.
- Stop when you feel a deep stretch in the hip of the elevated leg.
- Hold for half a minute before switching to the other side.
Essential Professional Tips for Safety
Regardless of the variation you choose, consistency and proper form are vital for success. Always remember to keep the ankle of the crossed leg flexed; this simple adjustment is crucial for protecting the ligaments within the knee. If you find yourself suffering from constant hip tightness or discomfort from excessive sitting, incorporating this stretch into a daily routine can significantly enhance your flexibility and overall comfort.
Step-by-Step Instructions for the Figure 4 Stretch Exercise
Performing the Figure 4 Stretch Exercise correctly requires precise alignment to ensure you are targeting the right tissues rather than putting undue stress on your joints. Follow these steps to master the supine version, which I have used personally to recover after long sessions of heavy lifting or hours spent behind a steering wheel:
- Lie flat on your back with your knees bent and feet placed firmly on the floor.
- Cross your right ankle over your left knee to create a „4” shape.
- Flex the foot of the crossed leg to engage the muscles and protect the knee joint.
- Reach through the gap and clasp your hands behind the thigh of the leg still on the ground.
- Gently pull that leg toward your chest until you feel a deep, controlled stretch.
The Seated Variation for Office or Travel
The seated variation is the perfect solution for those who need to alleviate hip tightness while at their desk or in a chair. Sit upright in your chair with your feet touching the ground and aim for a 90-degree bend in the knee of your supporting leg. Cross your ankle over the opposite knee, then lean forward while keeping your back straight; this adjustment allows you to achieve a deep release in the hip capsule without needing to lie down.
Physiological Benefits of the Figure 4 Stretch Exercise
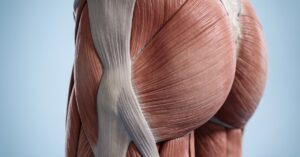
This exercise is essential for long-term health because it systematically relaxes the piriformis muscle located deep in the buttocks, which is a frequent culprit in chronic hip and lower back pain. By targeting the gluteus medius and associated pelvic muscles, you directly aid hip mobility and stability, which are critical for maintaining a healthy posture and athletic performance. Furthermore, this practice is a proactive way to prevent nerves from being compressed, which significantly reduces sciatica symptoms and alleviates the muscle tightness often associated with long periods of sitting at a desk.
Targeted Muscle Groups and Anatomy
The Figure 4 Stretch Exercise engages the entire posterior hip chain, making it one of the most efficient movements for overall lower-body health. Understanding the anatomy involved helps you focus your mental attention on the specific area you are trying to release.
| Muscle Group | Function in Movement |
|---|---|
| Gluteus Medius/Maximus | Primary targets for tension release |
| Deep External Rotators | Relieves deep-seated stiffness |
| Outer Hip & Pelvic Muscles | Improves overall joint range of motion |
Routine Integration for Optimal Mobility
You should perform this movement consistently, committing less than ten minutes a day to see meaningful changes in your range of motion. Think of this as a non-negotiable maintenance task for your body, just like brushing your teeth or prepping your meals for the week ahead.
- Frequency: 2 to 3 sets per side, daily or multiple times if needed.
- Duration: 20 to 60 seconds per hold (10-20 seconds for beginners).
- Mindset: Focus on deep breathing to help the muscles surrender to the stretch.
Important: If you feel sharp or shooting pain, back off immediately; this is a stretch, not a test of your pain tolerance.
Figure 4 Stretch Exercise Versus Pigeon Pose
The Figure 4 Stretch Exercise is generally superior for individuals with knee sensitivities or those who require spinal support, as it is a supine, reclined position that keeps the joints protected. In contrast, the Pigeon pose is an active, yoga-based posture that requires a higher level of balance and joint stability, making it more challenging for those with limited mobility. Because the Figure 4 is a variation of the classic Eka Pada Raja Kapotasana, it provides a safe, controlled way to target the glutes, hamstrings, and deep hip rotators without the intense balancing requirements of the active, upright Pigeon pose.
Frequently Asked Questions
Can I perform this movement on a bed or a soft surface?
It is generally better to perform this on a firm surface like a yoga mat or a carpeted floor. A soft bed may lack the necessary stability to maintain your spinal alignment during the stretch.
Should I hold my breath while doing the stretch?
You should maintain slow, deep, and rhythmic breathing throughout the entire hold. Holding your breath can increase muscular tension, which is the exact opposite of what you want to achieve with this exercise.
Does this stretch replace a full warm-up?
This movement is considered a static stretch, so it is most effective when performed after a light warm-up or at the end of a workout session. Stretching cold, stiff muscles is generally less effective and can sometimes lead to minor strains.
Is this stretch suitable for elderly individuals?
It is often recommended for older adults to help maintain hip health, provided they have no specific medical contraindications. If you have had hip surgery or severe arthritis, please consult your healthcare provider before beginning any new routine.
Prioritise flexing your foot during every repetition to keep your knee stable and protected throughout the movement. Your body will thank you for this simple, consistent habit as you reclaim your mobility and move through life with greater ease.